3D Printed Pedal Project: Proof of Concept
 |
| Converted old SPD pedals to Platforms using 3D Printing. |
I wanted some platform pedals for an upcoming bike tour but only had SPD pedals. Spent a few days making some platform pedals using 3D Printer and a pair of SPD pedals for donor parts.
For this project I used stuff I already had. Some older SPD pedals and a 3D printer with an excess of PLA plastic. I'm also calling it a proof of concept because I would eventually like to make a series of these pedals that rival the performance of commercially available pedals but wasn't sure if I would be able to pull it off.
For those of you who just want a quick overview of what this project is, here's a video I made showing the steps I took to make the first pedal.
Resources:
Basically a list of the stuff I already had and therefore became the limiting factors for this proof of concept project.- Older Atac Carbon Time SPD pedals for parts
- Autodesk Fusion 360 version 2.0.3257 for 3D modeling
- Cura 2.6.2 to generate G-code
- Ultimaker 3 with a .4mm nozzle to 3D print the pedals
- Ultimaker PLA Green 2.85mm plastic material
- Lots of free time
Design:
I disassembled the Atec Carbon donor pedals and measured all the lengths and diameters of the pedal axle. (Also called a pedal spindle. Not sure of the proper name. Just making it up as I go.) The pedal axles were about 85mm in total length, made of some kind of steel and used one 15mm diameter sealed bearing.I started drawing a pedal in Fusion 360. In general I wanted it to be about 80-90mm square and as thin as possible. I also wanted to incorporate some more modern platform pedal features I've seen, such as a parallelogram shaped side profile and curved tops/bottoms. I'm just guessing here but I think these features help with grip and general rider comfort. (I have a few more theories about how pedal shape could minimizing damage during a pedal strike or make it easier for your foot to find the pedal again once its slipped off but I have no evidence to support those ideas.) I eventually ended up with a pedal design that was 80mm wide, 88mm long and 20-25mm thick. I also added some horizontal slots so pedal straps could be added later on. Though in hindsight I should have made those slots a bit long.
Note: You can download the pedal models on Thingiverse. (https://www.thingiverse.com/thing:2518467) I have uploaded two versions. The first version is the exact same stl files I used to print these. The second version are with a 2mm through hole instead of the profiled bearing surfaces. This should make it easier to cut out the center to match whatever spindle and bearing diameters you may need for your own project.
 |
| Side profile of pedal design. Shows the parallelogram shape and curved top/bottom faces. |
Test Prints:
When I was finished with the pedal design it was time to print it. But there was a problem. I had no idea if what I modeled in Fusion 360 would come out dimensionally accurate when printed. The overall shape of the pedal doesn't matter too much if its a millimeter or two off. But if the inner diameters were misprinted slightly then the pedal would either not spin freely or be way too loose. So I modified my model to only show the center portion and printed a few test parts.
As you can see, it took a few tries to get it right. The trick was to calibrate my printer using two setting in Cura. Line Width and Horizontal Expansion. As defined by Cura:
- Line Width: "Width of a single line. Generally, the width of each line should correspond to the width of the nozzle."
- Horizontal Expansion: "Amount of offset applied to all polygons in each layer. Positive values can compensate for too big holes; negative values can compensate for too small holes."
Update: Link Width should be about 7/8 x Nozzle diameter. I was using a .4mm nozzle so the line width should have been .35mm. Bumping this up to .5mm with a .5mm nozzle could have been the reason for these prints not performing very well. For prints after this I will use a line width of 7/8 x Nozzle Diameter.
I am no 3D printing expert but this iswhat I did to calibrate these two values. I printed a wall that was one line thick and then physically measured it with calipers. This measured value was my new Line Width value. With that set I then printed a series of small blocks with a 10mm diameter hole repeating the following steps until the block I printed had a measured value of 10mm:
I am no 3D printing expert but this iswhat I did to calibrate these two values. I printed a wall that was one line thick and then physically measured it with calipers. This measured value was my new Line Width value. With that set I then printed a series of small blocks with a 10mm diameter hole repeating the following steps until the block I printed had a measured value of 10mm:
- Print a block with a 10mm hole.
- Measure the hole with calipers.
- (Measured Value - 10mm) / 2 = New Horizontal Expansion Value
I only had to print 3 blocks to get this right. The second block measured 10mm but I printed a third just to check that my 3D Printer was repeatable. Luckily, my Ultimaker 3 has been very consistent and reliable.
First Proof of concept: Left Pedal
The first print was a bit of an over design. I really wanted it to work so I printed it with really thick 3mm walls and a relatively low layer height of .15mm. This means the print took over 13 hours. All of my print settings are below. When This print was finished I assembled it and took it for a quick spin around the neighborhood. The test ride was a bit weird with one platform pedal and one SPD pedal. Despite the awkwardness it was a success. The pedal didn't crack, break or fall off. |
| Finished Prototype Ready for first ride. |
 |
| Cura Setting and setup for Third Proof of Concept |
- Layer Height: .15mm
- Line Width: 0.5mm
- Wall Thickness: 3mm
- Horizontal Expansion: -.15mm
- Infill: 35% Triangles
- Print Temp: 200C
- Plate Temp: 60C
- Filament Diameter: 2.85mm
- Flow: 100%
- Print Speed: 70mm/s
- Cura Generated Break Away support
- Build Plate Adhesion: Brim 15mm
- Print Time: 13hours 8minutes
- Filament Used: 11.36m
- Material Used: 89grams (Calculated by Cura)
- Material Cost: €5.99 (Estimated by Cura)
Second Proof of concept: Right Pedal
With the success of the first pedal I started making the second. But I really wanted to do away with the long print time so I made two changes to the print settings. I bumped the layer height to a massive 0.27mm and a decreased the wall thickness to 2mm. This effected the print time considerably. It now only took 6.5 hours. Print settings shown below with the changes shown in bold.- Layer Height: .27mm
- Line Width: 0.5mm
- Wall Thickness: 2mm
- Horizontal Expansion: -.15mm
- Infill: 35% Triangles
- Print Temp: 200C
- Plate Temp: 60C
- Filament Diameter: 2.85mm
- Flow: 100%
- Print Speed: 70mm/s
- Cura Generated Break Away support
- Build Plate Adhesion: Brim 15mm
- Print Time: 6hours 30minutes
- Filament Used: 9.94m
- Material Used: 78grams (Calculated by Cura)
- Material Cost: €5.24 (Estimated by Cura)
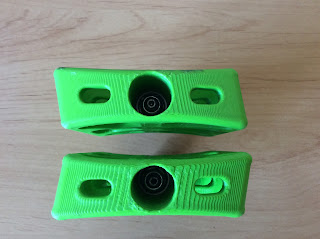
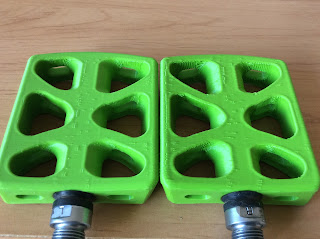
This decrease in print time was great but it did have a negative affect on overall quality. I figured this would happen but I wasn't prepared to how bad it would be. Below are comparisons in aesthetic quality between the two pedals. The pedal with .27mm layer height just doesn't look good in my opinion.
 |
| Left: .15mm Layer Height (First Print) Right: .27mm Layer Height (Second Print) |
 |
| Upper: .15mm Layer Height (First Print) Lower: .27mm Layer Height (Second Print) |
 |
| Left: .15mm Layer Height (First Print) Right: .27mm Layer Height (Second Print) |
With the first set completed I went for a short test ride. It was a short test ride because the second printed pedal of .27mm layer height cracked going up the first steep hill. In its defense, I ride a single speed mountain bike thats geared high and the hill was very steep. This means I was mashing down on the pedals with everything I had. It also cracked right where the steel pedal spindle and bearing stop support it. This tells me in the future I should probably use longer spindles and support the pedal as far out as I can.
 |
| Second Print, Cracked Pedal |
 |
| Second Print, Cracked Pedal Closeup |
 |
| Second Print Cracked Pedal Closeup. Notice the crack extends another 10mm or more along the center section in two directions. |
Third Proof of concept: Right Pedal Again
With the second pedal broken I decided to print it again. I still didn't want to deal with the 13+ hour print time so I found a middle ground. I changed the Layer Height to .17mm and the Wall Thickness to 2.5mm. This made the print time a still long but more reasonable 11 hours and 19 minutes. Full print settings below.Layer Height: .17mm
Line Width: 0.5mm
Wall Thickness: 2.5mm
Horizontal Expansion: -.15mm
Infill: 35% Triangles
Print Temp: 200C
Plate Temp: 60C
Filament Diameter: 2.85mm
Flow: 100%
Print Speed: 70mm/s
Cura Generated Break Away support
Build Plate Adhesion: Brim 15mm
Print Time: 11hours 19minutes
Filament Used: 11.06m
Material Used: 87grams (Calculated by Cura)
Material Cost: €5.83 (Estimated by Cura)
Further Testing:
The whole reason for this project was to have a set of platform pedals on a short bike tour. This tour turned out to only be one day because of scheduling and the weather but still totaled about 50km long. That's 50km of hills, mud and sand with a bike fully loaded. The pedals held up well, were comfortable and despite the smooth plastic surface were surprisingly grippy. There were however no pedal strikes or crashes which a good and bad thing. Maybe I should purposely ride aggressively and carelessly to test how durable they are. Will search for a local rock garden trail for future testing. |
| First Printed Pedal After 2 weeks of riding. |


Comments
Post a Comment
Write a comment here. Let me know what you think...